Equipment:
- Pin Tail Comb
- Paddle Brush
- Scissors
-Sponge
- Stipple Sponge
Products:
- Pre Impression Bald Cap
- Water Spray
-Strong Hair Gel
-Spirit Gum
-Spirit Gum Remover
-Acetone
- Supra Colours (Greasepaints)
- Foundations
-Translucent Powder
Method:
1: The first step is to wet the entire hair with a water spray and using a paddle brush to ensure all the hair is wet.
2: Using the hair gel, place throughout the hair, making sure you scrape the hair away from the forehead. Separating the hair into two sections.
3: With one of the sections wrap it around the head over the top of the other section and stick it down as smooth to the day as you can.
4: Repeat step 3 but with the other section going underneath the other section. The hair must stick to the head with gel only or even soap if there is no gel left.
5: The next step is put the bald cap on, asking your model to place to fingers pointing out by the forehead. Place the bald cap on there hands then pulling the cap back until it is sat on the head and is positioned right and making sure the hair is still in place and hasn't come unstuck.
6: When the bald cap is correctly positioned the next step is starting to cut away all the excess cap.
- Firstly cut along the top by the forehead.
- Then slowly cut behind the ears straight up. then slowly cut pieces away until you can pull the ear out and the bald cap sits comfortably behind the ear.
- Cut a way some of the cap at the back of the head but making sure that your model leans forwards for this as if you cut it when they are sat upright it could ping off.


7: Once you have the rough shape of the bald cap you can go back in to cut away pieces that are either too long or isn't straight ish, don't worry if it isn't completely straight.
8: Peel back the bald cap, then apply spirit gum to the skin and then to the bald cap, wait until it becomes tacky/sticky then stick back on the skin making sure there is no folds or bumps.
9: Using damp couch roll to press onto the cap to make sure that it is properly stuck.
10: When the bald cap is stuck down, use acetone to blend away the edges.
11: Next step is to colour the cap, using the supra colour palette mix together the white and a red to create a pinkish colour and dap on to the cap with a sponge
12: Using a foundation colour that matches the skin, dap on top of the pink greasepaint with a clean sponge.
13: Either with a large brush or makeup puff , and a fair amount of translucent powder to the head.
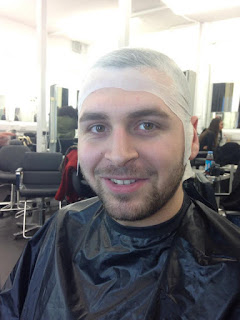
For creating males using a stipple sponge and black greasepaint dab on the sides by the ears to create the look of stubble. Then powder over the top of that.
2: Using the hair gel, place throughout the hair, making sure you scrape the hair away from the forehead. Separating the hair into two sections.
3: With one of the sections wrap it around the head over the top of the other section and stick it down as smooth to the day as you can.
4: Repeat step 3 but with the other section going underneath the other section. The hair must stick to the head with gel only or even soap if there is no gel left.
Although today my model was a male so I didn't have to do steps 1-4.
5: The next step is put the bald cap on, asking your model to place to fingers pointing out by the forehead. Place the bald cap on there hands then pulling the cap back until it is sat on the head and is positioned right and making sure the hair is still in place and hasn't come unstuck.
6: When the bald cap is correctly positioned the next step is starting to cut away all the excess cap.
- Firstly cut along the top by the forehead.
- Then slowly cut behind the ears straight up. then slowly cut pieces away until you can pull the ear out and the bald cap sits comfortably behind the ear.
- Cut a way some of the cap at the back of the head but making sure that your model leans forwards for this as if you cut it when they are sat upright it could ping off.


7: Once you have the rough shape of the bald cap you can go back in to cut away pieces that are either too long or isn't straight ish, don't worry if it isn't completely straight.
8: Peel back the bald cap, then apply spirit gum to the skin and then to the bald cap, wait until it becomes tacky/sticky then stick back on the skin making sure there is no folds or bumps.
9: Using damp couch roll to press onto the cap to make sure that it is properly stuck.
10: When the bald cap is stuck down, use acetone to blend away the edges.
11: Next step is to colour the cap, using the supra colour palette mix together the white and a red to create a pinkish colour and dap on to the cap with a sponge
12: Using a foundation colour that matches the skin, dap on top of the pink greasepaint with a clean sponge.
13: Either with a large brush or makeup puff , and a fair amount of translucent powder to the head.
For creating males using a stipple sponge and black greasepaint dab on the sides by the ears to create the look of stubble. Then powder over the top of that.


No comments:
Post a Comment